
Cylinder Head (torque sequence)
Stage (1) 20Nm or 15 lbf ft Stage (2) angle tighten through 180 degrees. Stage (3) angle tighten finally through another 180 degrees. Cylinder head gasket used was LVB-0000320.
With various aspects of servicing, maintenance, including driver assisted features and vehicle monitoring. For our 1996 Rover 200 and the 04 ZR 120+
About features, and driver notifications on our MG-Rover Information Pages
Stage (1) 20Nm or 15 lbf ft Stage (2) angle tighten through 180 degrees. Stage (3) angle tighten finally through another 180 degrees. Cylinder head gasket used was LVB-0000320.

Camshaft's bearing carrier's 26 x 10mm bolts, were then torqued to the shown specific order of 1 to 26 to just 10Nm or 7lb ft. with silicone sealant applied, then the camshaft cover gasket can now be fitted.

A new cam cover gasket was fitted, this went on dry, or with sealant added, to the cleaned surfaces, and fitted correct way round its marked up. LDR-102000 was used for this project.
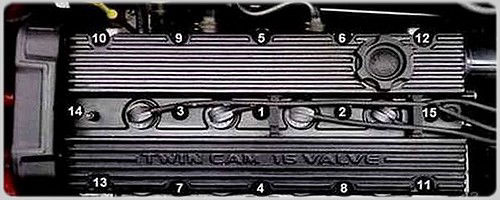
Engine top cover was torqued up in the sequence shown here. 15 x 8mm bolts, to 9Nm or 6lb ft. or just hand tight, a diagram of ignition leads from distributor cap to plugs, is always a good reference.
At this stage, and with a good lubrication of engine oil applied to each of the cam bearing surfaces before assembly, regarded as good practice prior to the engines initial first start up. We now have the air filter, oil filter. And correct amount of engine oil, and coolant to be added. .
Fitting the oil filter, without it first being 'primed' is bad news. the engine will be starved of lubrication during the critical few seconds, it will take before it is actually filled, and ready to begin circulating the fresh oil around the engine.
Applying a light smear of oil to the filters rubber gasket wont 'scrunch' it up when screwing back on, then using some folded 'coarse' sandpaper along with hand pressure only, would be sufficient to tighten it up, then a good run out to circulate all fluids. Rover 200 project 2004.
Information is referenced only to our 1996 Rover 200 and 2004 ZR 120+